Copyright © 2005
Yaodong Bi
1. The MVC Architecture and Web Three-Tier Architecture
The Model-View-Controller (MVC) architecture originated from Smalltalk as a method for separating user interfaces from application data. MVC modulizes software applications into presentation components (user interface), the View, data components, the Model, and input processing component, the Controller based on software engineering principles. The essence of MVC is to separate concerns into different modules. The View is responsible for presenting data to the user, the Model is the data needed by the application, and the Controller is responsible for input processing.
2. What Will Be Installed?
Through this tutorial, you will first install J2SE 5.0's JDK 1.5 , which will be the foundation for all the other installations. JDK 1.5's Java compiler will be used by Eclipse to compile Java programs and Java servlets. The next component to be installed is Apache's Tomcat (version 5.5.7) as the Web server. JDK 1.5's JRE will be used by Tomcat to execute Java servlet classes. Next component is the open source integrated developemnt environment by IBM, Eclipse. Eclipse will be used to organize all components, including needed jar files, imported libraries, source code packages, and it is also used to build deployment-ready Web applications. Eclipse by its default installation is not ready for Web applications development with Tomcat yet. Next step is to make Eclipse ready for Tomcat projects by installing the tomcat-plugin designed for Eclipse. With tomcat-plugin installed, Eclipse is able to create Tomcat projects, which include creating a basic standard directory structure, including packages commonly needed for Web applications.
Next component is called Ant. Although Ant is installed by default as part of Eclipse, it deserves attention since it is the tool you will use to compile, build and deploy Web applications to the Tomcat Web server. Another tool is Junit, which helps us in testing Web applications. Large software systems are often developed by a team of programmers rather than a single individual. Although each programmer is often responsible for implementing certain modules, he/she must share some modules that are needed by all the programmers. CVS, Concurrent Version System, is a version control system with functions for team members to share common code. CVS will be installed, normally by the system adminstrator, on a separate machine which is accessible to all members of the team through Internet. Eclipse has a rich set of functions for a developer to commit changes made on the loca copy to a CVS repository, check out updated version of modules from the respository, and synchronize the local copy with the copy at the CVS respository.
Install J2SE 5.0 on Windows XP
1. Download Java J2SE 5.0's JDK 1.5
Click the following link to download JDK 1.5.
http://dlc.sun.com/jdk/jdk-1_5_0_01-windows-i586-p.exe
2. Install JDK 1.5
Double click the downloaded file and take the default installation location to have it installed at c:\program files\java\jdk1.5.0_01\ .
3. Configure JDK 1.5
Go to Window's Start -> Control Panel -> System -> Advanced ->Environment Variables -> System Variables . Add to the global environment variable PATH: c:\program files\java\jdk1.5.0_01\binand add a new environment variable: JAVA_HOME with value c:\program files\java\jdk1.5.0_01. The installation of Tomcat and Eclipse will use those variables to find Java compiler and JRE (Java run-time environment).
4. A Note
It is not necessary to install J2SE 5.0's JDK 1.5 if you have J2SE 1.4 installed. However, Tomcat 5.5.x is configured to work with J2SE version 5.0 or later. If you decide to use J2SE 1.4, I suggest that you installed an earlier version of Tomcat, for example, 5.0.
Whichever J2SE version you choose, you may want to adjust PATH and JAVA_HOME accordingly since they will make your later installations much easier.
Install Apache Tomcat on Windows XP
Apache Tomcat is a Web server that supports Java as the server-side programming language. Java uses a set of classes called Servlets to interact with Web clients. Tomcat is often called Java Servlets container. Tomcat can be installed as a package to an Apache Web server. When the Apache Web server receives a request for Java Servlets, it will ask the Tomcat package to handle it. Apache Tomcat can also be installed as a stand-alone Web server. This tutorial assumes a stand-alone Web server.
1. Download Apache Tomcat
Click the following link to download the latest version (as of October 4, 2006) of Apache Tomcat;
http://mirror.olnevhost.net/pub/apache/tomcat/tomcat-5/v5.5.20/bin/apache-tomcat-5.5.20.exe
This only downloads the binary version of Tomcat 5.5.20. You can get the source, compile it, and then install it yourself. But for a normal installation on Windows XP, the binary version is good enough and it is the simplest way to do it.
2. Install Apache Tomcat
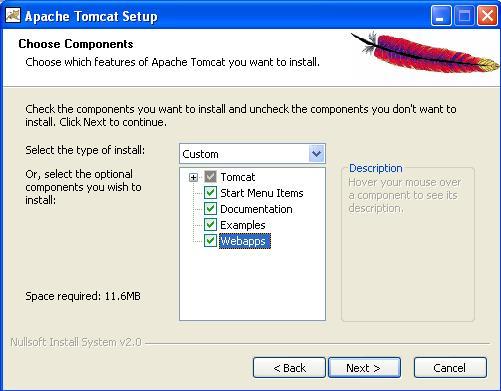
Double click the downloaded file to start installation. After clicking through Welcome and License Agreement windows, the following Choose Components window displays, you want to select Examples and Webapps components, which are necessary for testing your Tomcat installation as a later step of this tutorial.
Click Next.
You may just take the default installation location, which is under c:\Program Files\ .
Port #: In the installation process you are asked to enter a port number for clients to connect to your Tomcat. The default port number is 8080, but I suggest you change it to 8081. The reason is that the University of Scranton blocks communications to ports 80 and 8080 of all machines on campus except designated school web servers, such as www.cs.uofs.edu and www.scranton.edu. Using port 8081, your Tomcat can be accessed on and off campus in case you need to test your project with your team members who are from outside the University's network.
Admin: You are asked to enter a password for user admin. This admin is for Tomcat only, it has nothing to do with the Administrator account of your Windows XP. This user id (admin ) and its password are necessary for you to deploy Web applications to this Tomcat Web server.
JRE: The next thing you need to configure is where JRE is located. If you have specified the JAVA_HOME environment variable, the value displayed on the screen is normally correct. It would not hurt if you just double check. If not correct, find the location and enter the correct path.
Startup: It will ask you whether you want to start Tomcat Web server after installation. Just choose yes. Now you should find the Tomcat monitor "icon" displayed at the right bottom corner of your Windows desktop.
Congratulations! You have completed the installation of Tomcat.
By default, Tomcat does not allow listings of files and directories, when no welcome file is found or defined, under an application through Web browsers. If you want this feature, you need to modify the web.xml file save in /TOMCAT_HOME/conf/web.xml. Change the value of attribute listings to true as shown below. For the sample project (you will download later) to be displayed properly, you should make the change.
<servlet>
<servlet-name>default</servlet-name>
<servlet-class>org.apache.catalina.servlets.DefaultServlet</servlet-class>
<init-param>
<param-name>debug</param-name>
<param-value>0</param-value>
</init-param>
<init-param>
<param-name>listings</param-name>
<param-value>true</param-value>
</init-param>
<load-on-startup>1</load-on-startup>
</servlet>
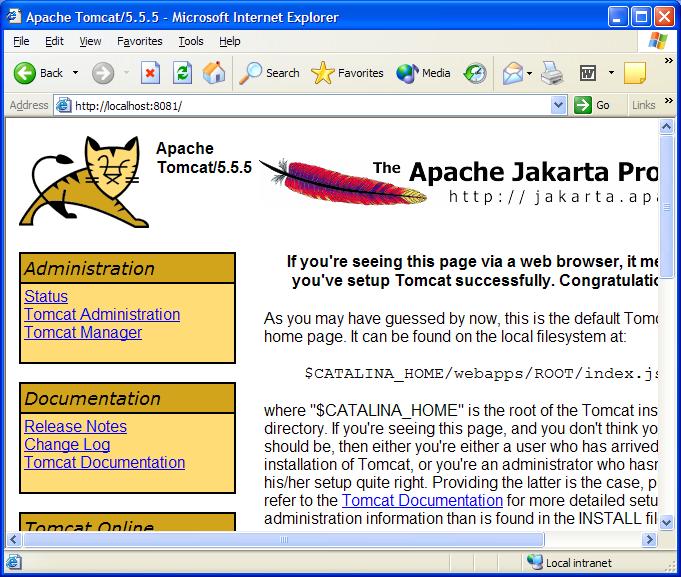
3. Test Your Tomcat
To test your Tomcat, start a Web browser, IE, Netscape, etc, and then enter:
http://localhost:8081/
The following screen should display:
Click the Tomcat Manager link on the left side, them enter admin and the password you entered earlier. After successfully loging in, Choose jsp_examples in the left column of the displayed table. Then select the execute link for Book Example under the section of SimpleTag Handlers and JSP Fragments, Now the following screen should display.
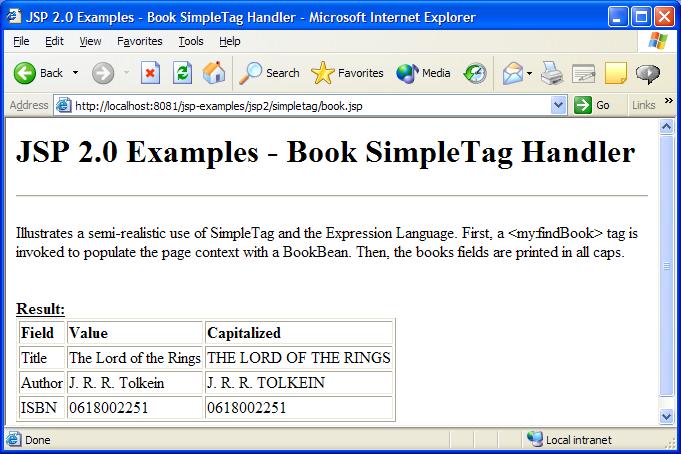
Congratulations! Your Tomcat installation is successfully completed.
4. How Tomcat Works
coming soon!
<<<--- Previous page <<< Home page >>> Next page --->>>